Since it's winter time, its fair that us players should know how to dress correctly in order to avoid any discomfort...
BASIC PRINCIPALS
We wear clothes in layers, as it is a tested way in order to keep us comfort in exterior spaces. This simple idea allows us to make fast adaptations depending on the level of our activity. Each layer has a different function. The internal layer manages the humidity. The intermediate layer isolates us from the cold. The exterior layer secures us from the wind and the rain.
INTERNAL LAYER: HUMIDITY MANAGEMENT
This is next layer from the skin. More from any other layer, it helps us to regulate the temperature of our body. If you have worn a cotton t-shirt under a raincoat, while you exercise, perhaps you remember the sense of humidity, even if you had not been in the rain. The natural perspiration trapped in our clothes, can create a feeling of discomfort. Cotton is an example of fibres that maintain the sweat and leaves us with undesirable shivers. The layer next to the skin should be made from material, like silk, wool or synthetic buckrams as REI MTS©, Patagonia©, Capilene©, Polartec©, PowerDry© and CoolMax©. They absorb the humidity and transport it from our skin to the exterior surface where it can evaporate. The result: We remain dry even after we have sweated and our clothes dry out faster. This is important for the maintenance of our body temperature during the summertime and the evasion of hypothermia in the wintertime.
The thermal underwear (a.k.a. technical underwear) is available in light-, mid- and expedition-weight levels. The choice of correct weight depends to the activity and the environmental temperature. Most of them are worn close to the body but with comfort for better output, the agility and the easier stratification of befalling layers.
INTERMEDIATE LAYER: TEMPERATURE MANAGEMENT
The intermediate layer helps us to maintain our temperature with the entrapment of air near to our body. Natural fibres, like wool and goose feathers are excellent materials for insulation. Woollen jumper and shirts (special the new generation of products from merino wool) offer reliable warmth and they maintain their insulating attributes even when wet. For very chills and lands conditions, the feather of goose continues being an exceptional choice. It offers insuperable proportion of warmth-weight and is particularly easy to compress. Its disadvantage is that it should it is maintained dry in order to it maintains its insulating ability. Classic fleece as Polartec© 100, 200, Thermal Pro© polyester, or Thinsulate© provide warmth for various from conditions. These materials are widely used because they are light, breathable and warm even when wet. Also, they dry out more rapidly and have bigger proportion of warmth to weight even from wool. As with thermal underwear, fleeces are available in 3 weights for different uses. Light-weight, for aerobic activity or cool climate. Mid-weight for moderate activity or climate and Expedition-weight for cold climate. Par example, for high energy activities as cross-country skiing, bicycling, hiking or Airsoft (eeeeehh?) we select light fleeces in order to avoid overheating. Products from Polartec© 100or Polartec PowerDry© are exceptional for this use. For very cold conditions we select fleeces like Polartec© 200 or 300. Wind fleece as Polartec Wind Pro© or Gore WindStopper© add a high level of protection from the wind via a concealed membrane which does not influence breathability.
EXTERIOR LAYER: PROTECTION FROM WIND, RAIN, COLD
The exterior layer protects us from the wind, the rain or the snow. The wrappings oscillate from very expensive jackets of mountaineering in simple raincoats, but their basic principals are to block the surge of water and they keep our body warm, allowing simultaneously our perspiration to escape. The exterior wrapping is important affair because if the wind and the water can infiltrate in our internal layers, we will begin to be cold. Moreover, with erroneous faculty of airing, our sweat will not be evaporated but will be condensed in the interior of our nutshell. As an example the simple 100% plastic raincoats (usually manufactured from polyurethane) keep us dry if we are static, but in no case they do not allow the concentration of perspiration to evaporate correctly. The completely waterproof and breathable wrappings are usually most functional but also more costly. Usually they are constituted by buckrams Gore-Tex©, REI Elements© with insulated seams and waterproof covering which are based on nanotechnology. These garments are low weighted and can be wrapped easily, are more friction durable, etc. Wrappings that are characterized as Water-Resistant/Breathable are better for light rainfall and high level activity. They are manufactured from buckrams of dense weave (as mini-rip stop nylon) that they prevent the wind and are covered with hydrophobic material so that they deter the surge of liquids in their interior. Soft Shells offer good protection from the wind and the rain, they are soft and they mainly breathe very well. Most allocate panel of buckram with flexible attributes for comfort during the duration of the activity.
Now go out there and play your heart out!!!!!
Δευτέρα 6 Φεβρουαρίου 2012
Κυριακή 28 Νοεμβρίου 2010
Job in an Airsoft shop...
It's been a while, but i got all shorts of shit going on. I have been "unemployed" (i actually run a free lance company that has nothing to do with airsoft) for about 10 months now and I have almost reached the situation where the SHTF i was trying to find myself other ways of financial support.
Last week, i was contacted by an airsoft shop here in Athens, in case i wanted to work for them. Since, Airsoft is the second best thing i do well i decided to take the offer. The shop is fairly new and still getting organised. It's not the biggest, it still lacks the variety of items offered by other shops, but it's strong point is customer support and warm communication.
I will try my best to contribute with my past experience and ability to search and come up with solutions...
If interested the shop is called Greek Airsoft and it's located in the southern part of Athens. Their site (which sports an e-shop (both in Greek and English) and forum (unfortunatelly only in Greek)) is here: www.greekairsoft.gr
Have a look around and for our Greek friends, they will be able to find me and chat at the shop...
Τρίτη 7 Σεπτεμβρίου 2010
Trasher's Toyota Hilux build up
Trasher's Toyota Hilux build up

This is how it all started with...
As mentioned in the PKM article, the best way to lighten a heavy MG is to place a pick up truck under it. Not only it gets the job done, but it also adds points to the coolness factor. And let me tell you, this truck adds a lot of points…
The truck is the 1994 Double Cab version and was bought from a Hungarian farmer for no more than 3000 euros if i remember correctly. It houses the «small» 2.4lt Diesel engine (lucky Europeans with your diesels…) with the poor 100+ something horsepower and a minimal lift on the suspension system. Initially since it’s a civilian truck, it was painted red with white rims. You can imagine how this will turn out, right?

The first thing done was to repaint it with OD with black rims. The painting was done in one of the Scorpions’ garage, since there was no point in spending money on a car that was going to be scratched by branches in the woods. Trasher calls it a «ghetto paintjob»… I can tell you that the job looks professional and there are no signs of «home made paintjob». At the same time a very basic bull bar was attached to the front of the truck.


These are taken during The Border War also. You can spot me in both the photos (yes, i am the smallest guy in the photos...)
On the way, a custom roof rack was placed above the cabin and a frame around the coach that can be covered with a tarp. Later on a snorkel was added to secure the engine intake system while crossing water barriers.

Finally the front «simple» bar was replaced with a bull bar with a winch.
Overall, it’s a job well executed and the only best thing i can think of is a Hilux with a full exoskeleton and a 3,5lt engine, a fully modded Land Rover Defender 110 or a tricked out Humvee. All these options might be cooler but the cost would be 3 to 5 times more. At the end of the day, all i can say is that i am extremely jealous…
Extended info and photos can be found at www.shooter.hu/hilux and browsing around the net for Trasher and Hilux...
This is how it all started with...
As mentioned in the PKM article, the best way to lighten a heavy MG is to place a pick up truck under it. Not only it gets the job done, but it also adds points to the coolness factor. And let me tell you, this truck adds a lot of points…
The truck is the 1994 Double Cab version and was bought from a Hungarian farmer for no more than 3000 euros if i remember correctly. It houses the «small» 2.4lt Diesel engine (lucky Europeans with your diesels…) with the poor 100+ something horsepower and a minimal lift on the suspension system. Initially since it’s a civilian truck, it was painted red with white rims. You can imagine how this will turn out, right?
The first thing done was to repaint it with OD with black rims. The painting was done in one of the Scorpions’ garage, since there was no point in spending money on a car that was going to be scratched by branches in the woods. Trasher calls it a «ghetto paintjob»… I can tell you that the job looks professional and there are no signs of «home made paintjob». At the same time a very basic bull bar was attached to the front of the truck.


These are taken during The Border War also. You can spot me in both the photos (yes, i am the smallest guy in the photos...)
On the way, a custom roof rack was placed above the cabin and a frame around the coach that can be covered with a tarp. Later on a snorkel was added to secure the engine intake system while crossing water barriers.
Finally the front «simple» bar was replaced with a bull bar with a winch.
Overall, it’s a job well executed and the only best thing i can think of is a Hilux with a full exoskeleton and a 3,5lt engine, a fully modded Land Rover Defender 110 or a tricked out Humvee. All these options might be cooler but the cost would be 3 to 5 times more. At the end of the day, all i can say is that i am extremely jealous…
Extended info and photos can be found at www.shooter.hu/hilux and browsing around the net for Trasher and Hilux...
Trasher's PKM airsoft project. A brief interview...

Well, I guess we all have been fascinated in the past by our dear John Rambo dwelling his M60 machine gun around with ease. Most probably because it’s an airsoft replica made by Top ,100% made out of plastic, so his fake muscle don’t even feel that… Has that movie affect you? Do you want to shoot your 7,62mm big ass machine gun? Well, then cowboy the fuck up and get a PKM. What? No airsoft company is making one? Hhhhmmm, if it ever comes out and it’s made by Inokatsu, it’s gonna cost a zillion euros? Well, then again, cowboy the fuck up and get a real one and convert it!!!!!!!!!!!!!!!!!!!
Once more, the man who does wonders has spoken. Mr. Trasher from the Scorpions team in Hungary is delivering lessons of airsoft mechanics and modding. Let’s see…
V: Trasher, it’s always good to have a chat with you. Especially when I wake up in the morning and I feel that my day is gonna be boring and I desperately need something to shake my water.
T: In this case, I got something for you. An airsoft version of the PKM, a real steel conversion.
V: Are we talking about the same «10+ kilos, big ass, huge, look at me I am fucking Spetsnaz shooting with one hand, PKM»?
T: Yes, more or less…
V: How the hell did you get your hands on something like that? Aren’t they supposed to be still used by the Military in the ex-Eastern Block?
T: PKMs are still heavily used all around the world, by regular or irregular armies, or private military contractors. Since these guns can take a lot more beating than the average AK, it’s quite diffucult to find deactivated ones, and typically they cost a fortune. Patience is the key.
V: Where did you acquire yours?
T: I bought it from a german company specialising in militaria and deactivated guns. It had all the proper proofmarks and paperwork.
V: Let me guess, it’s a little bit more pricey than the average Chinese clone out there, ugye? ( that means “right” in Hungarian, I am just purely showing off at this point…)
T: Basically, they come in different prices depending on condition. They can easily go as high as 1500 euros “new in the box”. I got mine for around 700 EUR, because some parts were damaged or missing.
V: So, one shinny day the mail man brought you a huge-mama package with the PKM inside. Then? I guess any kind of gearbox is not exactly “plug and play”.
T: Definitely not. I went to a friend of mine, a licensed gunsmith, and we gutted the whole thing. Receiver, trigger box, trunion, feeding tray was all cut, machined, irreversibly modified so this PKM now is more “dead” in real steel terms than ever before. The most difficult part was the barrel.
V: Ok, let’s start things from the rear to the front. What about the gear box?
T: We installed an A&K M249 gear box, which surprisingly fits with minor modifications and even more surprisingly, it was perfectly aligned with the bore. The internals of the gear box are now stock. Maybe in the future, I’ll upgrade it, but for the time being I am just trying to finish the project (which is still in progress at the time of this writing).
V: What about the hop up system?
T: Before installing a hop up, we had to work on the barrel. A special tool was made (for about 100 euros) and we bored out the barrel, removing the hard chrome plating and rifling altogether. Then the chamber was also destroyed, enlarged to fit the whole hopup unit inside. We retained the original quick barrel change feature, everything works like on the real steel counterpart.
V: So, you got the gear box and the barrel ready. Hop up? If you ever need one… The greatness of this piece is enough to spit out BBs at 700 FPS with a flat trajectory of 120 meters without a hop up system!!!!!!!!!!!!!
T: Come on, you are exaggerating all my AEGs are well under 400 fps these days… And I think the gearbox would crack under such a heavy spring. The hopup system is identical to the A&K M249 (with a Guarder 70 rubber inside) and is completely recessed in the outer barrel. We had to make an adapter from aluminium to feed the BBs, but the whole system is pretty consistent - the chrono showed 1-3 fps shot-to-shot variation when we first checked it. The ROF is satisfying, but nothing special.
V: I bet the inner barrel is quite long, right?’
T: Yes, we installed a 59cm long Gaurder tightbore (PSG length), it adds a little extra fps, but nothing special. The flash hider was also modified to take the barrel.
V: What about the magazine feeding system?
T: At this moment it uses the M249 system with some mods (like the adapter mentioned above). The metal tube is going from the left side of the receiver to the ammo box (manual or electric), it’s nothing special. With the modification of the hopup chamber, I can re-route the metal tube through the bottom of the receiver (through the drain-hole) to make the PKM look more realistic, but that’s something I’ll do later. Since I hate electric winding mags with a passion, the first boxmax was manual winding with the mech of an AK hi-cap inside. The capacity is around 4000-5000 BBs maybe? My electric boxmag uses MAG mini-SAW internals and runs on AA batteries.
V: I know that you have used the PKM in “The Borders War” in the Czech Republic. What do you think of it so far?
T: I used it as a support gun for day and night missions, but also for defense when rebels overran our understaffed base. With a handful of guys we managed to keep them at bay for about 30-45 minutes. I kept moving around the perimeter, the PKM worked flawlessly, cutting down flanking and rushing rebel elements. I was firing from the kneeling or standing position most of the time. It was a good fight… until the battery died. Then we all got killed…

Trasher with his PKM in The Border War last year in the Czech Republic...
V: Trasher, thank you for your time and your kindness once more. I really appreciate for all the information you shared with me about your build.
T: Don’t even mention it. It’s my pleasure.
PKM specs
Length: 116 cm
Weight: around 10-12 kilos (with boxmag and battery).
ROF: 750-800
FPS: 370-380
Effective range: 55-65 meters

Trasher's Hilux in the game. Notice the PKM sticking out the window...
As the weight of the PKM is a little more than the average AEG out there, the Scorpions team decided to make it easier to carry by adding a Toyota Hilux under it!!! Not a bad choice if you ask me… More on the Toyota is found here.
The whole photo set can be found here http://www.shooter.hu/pkm
Τρίτη 31 Αυγούστου 2010
Paracord Water Bottle Koozie

Hi all,
It seems that I got too much free time in my hands and I just can’t sit tight. Browsing around the net I came across some interesting constructions made with Paracord. Actually I have done some Paracord bracelets in the past, but this time it’s something different. I saw some guys making Paracord covers for their water bottles. I usually carry with me a water bottle and I thought, why not?
Since last week I had with me a Nalgene 1lt bottle (32oz for the non-metric people…) but I realised this summer that it is too big for my Fatboy, so I bought me a ½ lt one (17oz…). Unfortunately the only one that could be shipped to Greece was a purple one, but it still gets the job done. At the same time i purchased some Safety Red paracord (it’s not very Milsim styled, but i want for EDC) and started working… With no further delay, here it is…


Details of the fastening around the neck of the bottle.

The beautifull skull beads around the fastening

The koozie removed from the water bottle. This should hekp when washing is needed...
MATERIAL NEEDED
The material needed are not something extraordinary or rare, in fact some of our readers can purchase them in their local Walmart or so. For me i had to purchase them from Ebay as usual…

• The desired volume water bottle. I used a Nalgene bottle but it could be any other bottle, plastic or metal, it’s up to the user
• Paracord. I used Safety Red one, because it makes the bottle more visible, as i plan on using my bottle as an EDC (work, cycling, hiking, etc…). For the small ½ lt bottle i used around 10 metres (30 feet…) of it
• A pull cord stopper
• Two beads if wanted for decoration purposes
• The usual stuff needed for Paracord braiding like a lighter and tweezers.
THE BRAIDING

It all starts with a single loop of Paracord around the neck of the bottle. The length of it should be enough to allow it to tighten and loosen in order to remove the cover. I used some extra length so i could use some decorative beads at the end. In the photo i show a Coyote piece of Paracord to make it obvious…
Then, I just did a simple loop around the initial loop. It is simple as it is shown. Remember that at the end the beginning the cord must be knotted to be secure.
Grab the cord and bring it under the initial loop and pull it all the way. Leave some to create the eye of the netting.
Then bring the cord back and put it in the eye and pull it all the way. The length of the loop will determine how big the eye will be. Don’t make it too tight cause you will have to do this endlessly…
Go over and over again… I did about 8-10 eyes around each row and it took me about 2,5 hours. With smallers eyes it could be 1 hour and with smaller eyes it could take hours and hours…
At the end just tighten the knots to secure the Paracord at the bottom. As it’s usually done with Paracord, cut the cord and melt it with the lighter. Personally i also use some Super Glue on the final knot to secure it even more.
If desired you could put some beads on the initial loop (photo 1) or just make a knot. Again melt the ends, glue them and it’s done. Now go out there and hydrate!!!
Πέμπτη 11 Φεβρουαρίου 2010
SADF M83 chest rig
Since some time now I have been trying to reduce the amount of my tactical nylon by categorizing my gear according to the AEG platform used. So, I was looking for a platform to accompany my AKs, both for CQB and woodland games. I could just go the modular way and built it up. The problem lies there, because high speed gear manufacturers got the AR users in mind. Usually AK magazine pouches advertised as “doubles” are actually “triples”. For some reason they believe that the AK users need 50% more ammo compared to AR users to get the target… Stereotype believing, player haters I say… So, I started looking to old school gear made for the AK platform. During a chat over at Wannabe forums, the user named Optactical suggested the M83 chest rig. I looked into I, gathered all the info I could and I thought I should give it a shot. Lucky me. That’s the solution to my problems…

I spotted a M83 chest rig at ebay for 35 bucks and I purchased it, hoping for the best. 2 weeks after I paid for it, the post man brought a USPS package at my door. I opened it and I felt in love with what I saw inside. The SADF M83 chest rig…

MATERIAL AND COLOUR
The rig is made by ballistic nylon. Ballistic nylon is actually Cordura fabric. Of course there is no “Cordura” label since Dupont patented the name, after the M83 was produced. The colour is “Nutria Brown” which is a darker hue of what today would be described as Coyote Brown. Absolutely lovely … The finish of the rig and the straps are black like the fastenings. The stitching is really reinforced where it matters. In the following photo is obvious that the Nutria Brown blends with the MARPAT pattern extremely well...

LAYOUT
The design is fairly simple. The rig is just a rectangular panel with 4 pockets. Starting from the right side (wearing it) there is a relatively big pocket designed for the field trauma kit. Actually I intend having my PMR radio in there. Next to it and to the center there is a big pocket divided in 3 double cells for the magazines. Each of the double cells is covered by a flap that closes with a Velcro strip. To the left hand side there are 2 smaller pockets. One is the original radio pouch and a grenade pocket. The grenade pocket is way too small, so most probably I will rest spare batteries in it. The other one will be used as a general purpose pocket filled with speed loaders, extra flash light and a multi tool or so.
The rig is kept in place by 3 straps. 2 leaving the rig going up to the shoulders and to the back and 1 that secures it around the waist. The shoulder straps are thickly padded and they are very comfortable. A very useful feature of the straps is that they are quite far apart. Usually chest rig straps tend to be close and usually dig in the rear of the neck when loaded. No problem here…
The whole panel is backed with heavy duty mesh. To the rear of the panel there is a flat pocket for maps, intel, etc covered with a flap secured with Velcro.

 The magazine pouches fit AK magazines really well. Even thought it was originally designed for the R4 and R5 rifles (the SA version of the Galil) which look like STANAG magazines on steroids...
Bottom line, it's a well built, durable, well designed chest rig. I can't be happier with one...
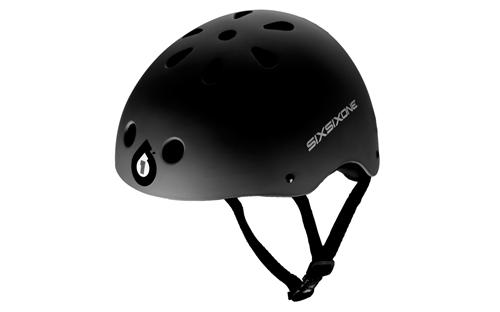
CQB/Urban protection helmet
Well, the title is quite catchy cause i had no idea what to call that thingy... It all started once upon a time when i wanted to start putting together a Black Kit for CQB games. Initially i was (and still am...) against black gear. I believe they look crappy, they don't help unless you play in night games and finally they are so passe... I decided to go that way because the rest of the team wanted to do so, so...
So, i looked around for a Protec style helmet that was mainly going to protect my head. It had to be non-military looking. I found on sales (cheap bastard...) at Chainreactioncycles a 661 Dirt Lid. I bought the black one to help my aftermarket work. I chose the small size on purpose. Usually helmets look huge on me, so i went for the small one and later i removed the inner crap and got left with just a light padding.
Everything started like this:
and ended like this:


Interesting, ehhhhh? Well, it's not that difficult and crafty after all...
The Velcros
The Velcros is nothing fancy. Just cut some stripes of black velcro and used hot melt glue to paste them down. I added extra glue all around them to secure them. I didn't bother painting the glue, since the helmet was gonna be painted.
The Bling Bling
Well, i tried (and insist on the word "tried"...) to keep this one fairly simple... Well, i just put an NVG mount, a Helmet Light and a pair of extra glasses on it. It's light, innit?
Actually the NVG mount is the one i had from my MICH wannabe. It's meant for the PASGT helmet, but it stays on this one just fine. For some reason i love the way that this mount with the plastic safety clip looks on a non-military helmet.

As it was made for CQB games, i liked to have some light on it. So, i want the more high speed way and purchased a replica of the Surefire LH1 light. Originally it was black, but it got painted like the rest of the helmet. I have to mention here, that this light is supposed to be mounted on thick Kevlar helmets. I had to modify it to fit on a plastic shell like mine. I also removed some part of my helmet to make it sit correctly. Finally i avoided installing it on a level parallel to the ground. It's a freakin light, it's supposed to light my path. So, i made it look at about 45 degrees. This way, it gives me the ability to see where i am going, but beong able to see who is coming my way at the same time...

The paintjob
Inittialy i was gonna leave it all black... But i am happy to announce that our team is getting rid of the Black Kit. Thanks God of Airsoft!!!!! I wanted to keep the helmet, but the black had to go. Since the other one is desertish, i had to find some paintjob for this one that would be different. I chose the following colours:

I didn't use a spesific pattern. I just laid a plastic sheet with a very small net and applied mists of colours from a distance. I applied light coats in order to avoid coverring 100% of the black underneath. I am very happy with the result as i believe that it would work in CQB, Urban and Woodland games (at least under spesific circumstances).
Till next time folks...
So, i looked around for a Protec style helmet that was mainly going to protect my head. It had to be non-military looking. I found on sales (cheap bastard...) at Chainreactioncycles a 661 Dirt Lid. I bought the black one to help my aftermarket work. I chose the small size on purpose. Usually helmets look huge on me, so i went for the small one and later i removed the inner crap and got left with just a light padding.
Everything started like this:
and ended like this:


Interesting, ehhhhh? Well, it's not that difficult and crafty after all...
The Velcros
The Velcros is nothing fancy. Just cut some stripes of black velcro and used hot melt glue to paste them down. I added extra glue all around them to secure them. I didn't bother painting the glue, since the helmet was gonna be painted.
The Bling Bling
Well, i tried (and insist on the word "tried"...) to keep this one fairly simple... Well, i just put an NVG mount, a Helmet Light and a pair of extra glasses on it. It's light, innit?
Actually the NVG mount is the one i had from my MICH wannabe. It's meant for the PASGT helmet, but it stays on this one just fine. For some reason i love the way that this mount with the plastic safety clip looks on a non-military helmet.

As it was made for CQB games, i liked to have some light on it. So, i want the more high speed way and purchased a replica of the Surefire LH1 light. Originally it was black, but it got painted like the rest of the helmet. I have to mention here, that this light is supposed to be mounted on thick Kevlar helmets. I had to modify it to fit on a plastic shell like mine. I also removed some part of my helmet to make it sit correctly. Finally i avoided installing it on a level parallel to the ground. It's a freakin light, it's supposed to light my path. So, i made it look at about 45 degrees. This way, it gives me the ability to see where i am going, but beong able to see who is coming my way at the same time...

The paintjob
Inittialy i was gonna leave it all black... But i am happy to announce that our team is getting rid of the Black Kit. Thanks God of Airsoft!!!!! I wanted to keep the helmet, but the black had to go. Since the other one is desertish, i had to find some paintjob for this one that would be different. I chose the following colours:
- Dust Grey by Montana
- Dark Brown by Humbrol
- Manilla Green by Montana

I didn't use a spesific pattern. I just laid a plastic sheet with a very small net and applied mists of colours from a distance. I applied light coats in order to avoid coverring 100% of the black underneath. I am very happy with the result as i believe that it would work in CQB, Urban and Woodland games (at least under spesific circumstances).
Till next time folks...
Τρίτη 28 Ιουλίου 2009
Links to my favorite teams
Being around and about, i have cooperated with individual players and teams. I was lucky enough to play in 3 different countries (Hungary, Greece and the Czech Republic) and get involved with different gaming styles.
I present you links to the teams i am feeling close to or being a member of.
First of all the Red Tigers team in Hungary. This is the first team i ever joined and played with. I met the guys in 2007 when i visited Hungary. The team is strictly Milsim oriented which attracted me in a various ways. I spent the first 3 months of my stay as a new recruit and after i proved my shit, i became a full member. Unfortunatelly i couldn’t stay for more than 7 months at that time. Afterwards, i was lucky enough to visit Budapest again this year for 3 months and reunite with the guys. It’s been a blast being back and having the chance to feel the same urge once more.
The team’s site is here http://tigrisek.digitalmania.hu/
Then, the Brotherhood of the Red Circle. Actually, this is the team we formatted with my buddy Deadlock. The whole thing started 3 years ago when i rediscovered Airsoft. We used to play with Deadlock about 15 years ago and i knew that he is skilled player. So, since day one, i was trying to put him back in the game… After coming back from Hungary, we came together and started organising… Since day one we knew that we had to go the «freestyle» way with the team, because there was no way we could agree on any reenacting factors (well, actually Deadlock being an Applied Arts person, he is into Sci-fi neoprene coveralls stuff, so…) and we knew that we wouldn’t attract any other players. We started putting pieces together and so came the Brotherhood…
The team site (which is under construction) is located here http://www.redcircle.gr/
The Hell Reckies Team. Actually the first batch of people with whom i played with after coming back to Greece. We use to play together in big games and kick ass… They are really good players and guys and we love teasing each other. Actually, i could be a member of their team, but wearing Black is not my style of things, so here you go http://hellreckies.com/index_gr.htm
The Scorpions Team. The second best choice for someone to learn about good Airsoft, if in Hungary. The team consists of serious and experienced players. The amount of Airsoft science in the team is incomparable. Everyone has been so friendly and willing to share his knowledge. If you got any question of any shorts, Wolverine and Thrasher is the person to talk to. Their site is here http://www.skorpioairsoft.hu/
Δευτέρα 27 Ιουλίου 2009
MICH 2000

Since most of our games are MOUT or CQB oriented, having the proper protection is a wise factor to consider. That includes helmet, knee and elbow pads. There are so many options to choose from that makes it difficult to stay on point… Well, for me there are two factors that i had to consider. The looks and the size. It had to be a military style helmet (PASGT, MICH, IBH, LWH, ACH and the like) and to be easy to find it in sizes. Usually replica helmets come in «one size fits all», which usually means HUGE!!!! Since i am wearing a 57 size hat (7 ¼ in US size), the 61 size of the replicas was out of the question. Looking around and asking my team mates, i came across the Chain Reaction Cycles shop located in the UK. Browsing around, i found the ultimate solution… The MACE SAS skate helmet. Yeap, a skate helmet that looks like a MICH 2000. The only odd looking details of this spesific helmet are the 4 air openings around the helmet… Well, no problem with that, i have done bigger mods in the past, right?
I purchased the helmet in a Small/Medium size (54-58 size) and Brown colour, which was a great platform to start from. I bout the helmet for a price of around 25 euros and another 8 for the shipping. This is how it all started...
I purchased the helmet in a Small/Medium size (54-58 size) and Brown colour, which was a great platform to start from. I bout the helmet for a price of around 25 euros and another 8 for the shipping. This is how it all started...
The moment i got, i had to cover the air holes. I glued a piece of plastic with epoxy resin. Then, i started filling the gap with resin. After some applications, the holes were covered. I sanded the excess of the resin to make it flat and uniform with the shell.
When it was done, i primed the shell with a dark brown spray colour. I let it dry and then grabbed my Montana spray cans. For this work, i chose a Light Tan, Pallish Brown and Flat Dark Earth hues. I applied several thin layers of colour, using an old scarf to create the pattern. When it was dry, i applied 2-3 thin layers of clear mat varnish and let it dry…
So, i got me a beautiful helmet, but it looks empty. So, i had to go the Spec Ops way once more. Inittialy i glued on the shell layers of Velcro, using a hot melt glue pistol. When the strips were secured, i applied lines of glue around them. Then, i painted these lines with a black paint, using a thin brush.

The chin straps were completely useless, so i replaced them with a set of original MSA MICH straps. Unfortunatelly i found them in Foliage Green, so i had to dust them with Tan…

The next step was to mount on the shell a real deal NVG mount strap. Actually, it is meant for the PASGT helmet, but damn these Ebay sellers…
 To secure my back up goggles i purchased a set of Goggle Retention Straps from Supply Captain in Coyote Brown. So, now my Arena Flak Goggles are nice and secure.

Finally, since the helmet is made for CQB work, i threw on it a simple Energizer head lamp. I would prefere to go the Petzl way, but i didn’t want to paint it, so i chose to go cheap but with no guilt…

I guess it’s a good work. It looks the part and it’s absolutely stable on my head, compared with the rest of the crappy replicas out there…

Δευτέρα 29 Ιουνίου 2009
M249 S.P.W.

NO, IT’S NOT A MINIMI!!!!!!!!!!
The Minimi (short for French: Mini Mitrailleuse; “Mini machine gun”) is a Belgian 5.56 mm light machine gun developed by the Fabrique Nationale (FN) company in Herstal. First introduced in 1974, it has entered service with the armed forces of several countries (Greece being one of them, even though we are 25 years late as usual…). It is configured in several variants, the standard model, the Para version and the vehicle model. The S.A.W. is just the US Army adoption of the same model built in the States.
The M 249 S.P.W. / MK 46 is an M249 variant developed to meet a US Special Operations Command requirement for a lightweight machine gun that would retain the intrinsic functionality and reliability of the standard M249. Weight reduction was achieved by:
· Using a new lightweight fluted barrel (Para length)
· Removing the magazine feed port, carry handle, integrated bipod, gas block regulator (stable ROF of 750 RPM compared to 750-1000 of the other models) and vehicle mounting lugs
· Using a 100 rd soft box magazine instead of the plastic 200 rd one
· Incorporating a titanium bipod.

The work done on the S.P.W. lead to a weight of 5,7 kilos compared to 6,8-7,5 kilos of its bigger brothers. Unique to the S.P.W. / MK46 is the forward rail that accommodates scopes, laser designators and flashlights. So, to make it clear:
Army S.O.COM. units -> M 249 S.P.W.
Navy S.O.COM. units -> MK 46
Since I am not into Seals re-enactment we can just call it S.P.W.
Navy S.O.COM. units -> MK 46
Since I am not into Seals re-enactment we can just call it S.P.W.

CAMOUFLAGE PATTERN
The finish of the model out of the box is ok, nothing exciting but nothing to complain about. The truth is that the mat black colour seems a little “plastic” though, but that’s because the body is plastic (STAR must do something about it, like to produce a metal aftermarket body…). The “need” to decorate it with a pattern had grown inside me even before I got my hands on the MG.
The feature of the “fast spring swap” is really handy but it created a slight confusion when it came to deciding on the colours and the pattern. If the AEG was intended for CQB games, then it should be covered with tan, light grey, light brown hues. In the case of woodland games it should be painted with more dark brown, OD, dark earth and so on…In this specific case it takes about 20 seconds and a spare spring to up/down grade it between 330 and 430 FPS…Decisions, decisions, decisions…
Finally I went the middle way. I chose the following 5 spray colours:
Chocolate brown (mtnmtn Graffiti mat spray)
Flat dark earth (Humbrol modelistic mat spray)
Arkalis Beige (mtnmtn Graffiti mat spray)
Cream (mtnmtn Graffiti mat spray)
Dark Green (Humbrol modelistic mat spray)
I guess everybody notices that most of the colours are made for Graffiti…Due to the lack of mat model sprays in the market, I decided to use fine-grain mat Graffiti ones. They cost less (2,5 euros per bottle compared to 6 for the Humbrol ones) and the outcome is equally well finished.
Initially the AEG was stripped to its main pieces. The body, the front railed handguard, the magazine, the Fakepoint, the PEQ box, the grip and the stock. They were all wiped with a cloth to remove any dirt. Then every piece was sprayed with a couple of Chocolate Brown layers, used as a primer. It was allowed to dry for a day. Next afternoon I applied several stripes of the rest of the colours. Made sure that the pattern is irregular. It was left to dry and the next day the real artistic work began…Just the stripes don’t make the gun invisible, different or interesting…I had to come up with some kind of a pattern. Well, old news…An “S.A.S.” scarf lend me its little squares to do the job…The scarf was placed on the parts and small amounts of different colours were applied. I didn’t want the squares to be normal and regular (otherwise it would resemble the MAR.PAT. which was not the case here) so in some places I stretched it and in others I just “dropped” it on the surface. It took me a total of 2 hours of messing around with it to complete. Judging from the reactions of the players on the field who saw the final work, I can say that I am extremely satisfied with the outcome…Now, that gives me the confidence to try something along the lines on a future project (an SR25K, a Recon Rifle or a Noveske Diplomat maybe?).

INTERNALS
The internals of the AEG are left stock for the moment. I had the chance to use a chronograph and I have to say that I was impressed. With the factory set I got a 330 FPS velocity which is more than ok for CQB games. The impressing fact that with the stock spring (which is a M100 equivalent) I am getting an amazing 1120 RPM which means about 18-19 rounds per second… For woodland games I purchased a Systema M120 spring hoping to get 390 FPS out of the beast… For some strange reason I never got more than 370 to 380 FPS… I measured with 2 different chronographs but the gearbox is indeed longer than the average ones so the spring can’t give it all it could… Still with the stiffer spring I measured 1050 RPM ~ 17 rounds per second… That’s due to the fact that the motor is described as High Torque-High Speed from Star and I am happy they do… And I am happy for that, because all these results came from using an 8,4 V 3300 mAh battery… Various reviews state that using even an 9,6 V battery can cause such an increase to the ROF that the magazine can’t feed it fast enough, causing misfeeds…

The size and the weight of the 249 is absolutely begging for some more bust during woodland games. Well, I am begging for it since I find it completely dumb to run around a 5,5 kilos machine when the next man can have the same 400 FPS out of his 3 kilos sorry-ass M4… So, the future is painted with vivid colours of a Wild Monkey metal gearbox and a SP 120 spring hopping to reach a level of 420-430 FPS…
Δευτέρα 22 Οκτωβρίου 2007
M3 SHOTGUN "ILONA"
Having a shotgun as part of ones arsenal was always attracting for me. There are some very interesting models in the market. The choices are very limited though for the player who considers seriously skirmishing with them. Basically shotguns are well known and used for the massive firepower that they provide in close ranges. The only available replicas that do the job are Tokyo Marui series shotguns. They have a very clever system that allows you to shoot 3 BBs at the same time. But, they are all plastic and somehow weak (around the 270 FPS area). Then Maruzen, G&P and Marushin produce metal shotguns. Some of them are spring operated, gas operated, single shot, multiple shots, shell ejecting…you just name it. The problem with those is that they cost more than a starter’s AEG, which was out of the question for me… 


When I saw the Franchi 3A shotgun produced by Action Sport Games (made in

The power of the model is stated as 374 FPS on the box. I know what you are thinking “Yeah, right, a plastic Chinese model that shoots at 374 FPS. F**k that shit!!!” That’s absolutely correct. The truth is that this measurement was done using .12 g BBs. The replica’s power with .20 g BBs is around 300 FPS. Not bad for a CQB weapon…

The replica has an excellent feeling, having in mind that the retail price for it is around 35 euros… Its plastic made with the only metal part being the shell ejecting port. The magazine that comes with the shoti holds 30 BBs. Not bad, but the major issue here is that there are no spare magazines available in the market. You might think that since it is a Maruzen 870 clone the magazines are interchangeable. Not!!!!


In my mind, shotguns should always have female names. Where I am coming from the most usual name for one is “Maria” but I though it was just not representing me. So, after some thought I decided to call her “Ilona”. The name was inspired from the great actress Ilona Staller, aka Cicciolina... (Now, do i see some faces smiling? Ehh?)

Ilona Staller as it was her original name was born in
The replica is completely stock when it comes to the internals (there is nothing you can do about it anyway…). The only change concerns the paint job. The basic idea was to create a paint theme that would make the shotgun invisible in the inside of a building.

Initially a layer of primer was applied. I didn’t want to make it flat in order to avoid having a glossy feeling. I used the tip of an old, round, thick brush and I “stamped” the paint on it.

The problem was that the primer is white, so I applied a layer of mat black spray colour. Now, when the shottie gets scratched the only colour being revealed underneath is mere black… The basic paint is an acrylic Sand colour. It was also applied with a brush. It was left to dry and then some very basic pattern was done by putting some paper adhesive tape. Then with a brush I applied a Dark Earth colour (actually it was labeled as “Wax”).

With a permanent marker I finalized the edges of the patterns and the letters on the side. Finally I applied a completely mat and flat layer of acrylic varnish.

Hope it’s satisfactory since it’s my first attempt to paint a gun…More to come soon.

Εγγραφή σε:
Αναρτήσεις (Atom)